

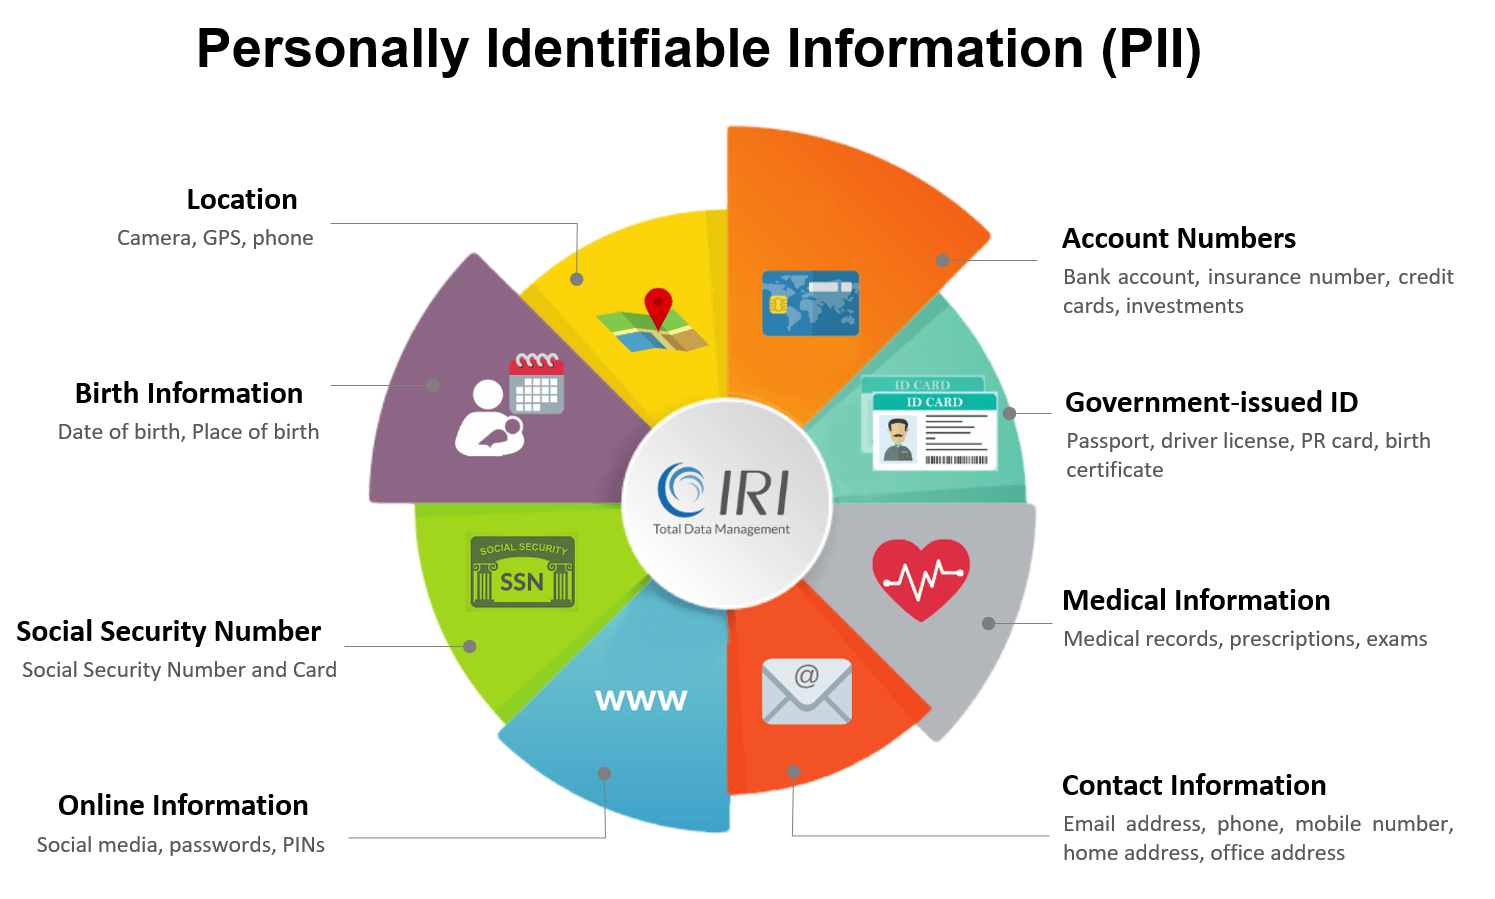
How to Classify, Find and Mask PII in Databases
Once they have made their database connections, IRI FieldShield users have a wide range of options for classifying, finding, and de-identifying sensitive data across one or more schemas. They can now effect all these goals at once through rule-based facilities in IRI Workbench.
This article demonstrates step-by-step the use of data classes for finding and masking PII across a simple database schema, though you could extend these steps to more schemas. Data is typically classified one schema at a time, but is masked globally using your saved rules, ad hoc or on schedule for updates.
The data masking rules you define allow you to select the function best suited to each class of data, and to apply it consistently. Producing the same unique ciphertext result for each unique original plaintext value — in any table or file — also preserves referential integrity; e.g., joins will still work after the data are masked.
This example uses sample the Oracle tables in the SCOTT schema provided in our VM sandbox. To connect to another database, you would need to configure:
- The DTP connection profile for your DB in IRI Workbench using JDBC
- The ODBC DSN for that source DB
For information on connecting your databases for use with FieldShield, see DB Setup here.
The steps I’ll be describing are:
- Setup – Define Data Classes & Masking Rules
- Scan – Run the Schema Data Class Search Wizard
- Review & Adjust – Data Class Library Editor
- Mask – Run the Data Class Database Masking Wizard
Setup – Define Data Classes & Masking Rules
To use data classes with rules and wizards, the data classes must first be defined and saved. This can be done through Window > Preferences > IRI > Data Classes and Groups. See this article on Data Classification in IRI Workbench for a deeper dive.
The data classes can match to columns either by column name (class EMAIL matches a column named EMAIL) or by matching the data contained in the column. This example has classes that either have a regular expression or a set file. A set file contains entries that serve as a dictionary look up.
On that preference page, confirm that these data classes exist:
- Class CREDIT_CARD that uses \b((4\d{12}(\d{3})?))|(?:5[1-5][0-9]{2}|222[1-9]|22[3-9][0-9]|2[3-6][0-9]{2}|27[01][0-9]|2720)[0-9]{12}|(3[47]\d{13})|(3(0[0-5]|[68]\d)\d{11})|(6(011|5\d{2})\d{12})|((2131|1800|35\d{3})\d{11})|(8\d{15})\b as a matcher.
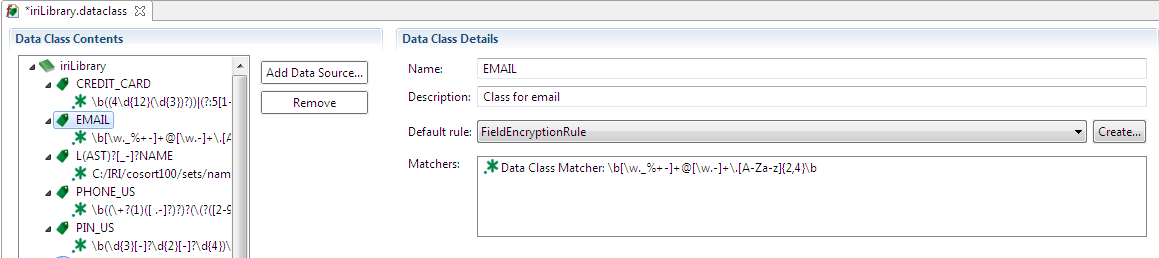
- Class EMAIL that uses \b[\w._%+-]+@[\w.-]+\.[A-Za-z]{2,4}\b
- Class PHONE_US that uses ^(\+?(1)([ .-]?)?)?(\(?([2-9]\d{2})\)?([ .-]?)?)([2-9]\d{2})([ .-]?)(\d{4})([ #eExXtT]*)(\d{2,6})?&
- Class PIN_US that uses \b([0-9]{3}[-]?[0-9]{2}[-]?[0-9]{4})\b
- Class LAST_NAME that uses set file C:/IRI/cosort100/sets/names/names_last.set
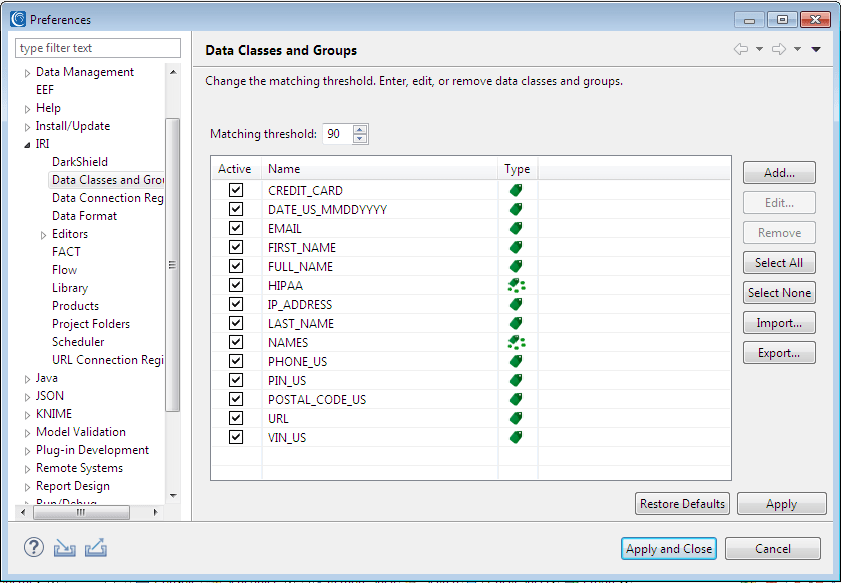
If they do not, click Restore Defaults.
At the top of the preference page, is an entry Matching Threshold. This represents the percentage of matches required for a column to be assigned a data class. The schema search will scan 4K blocks of data until matches reach this threshold. If it never reaches this threshold, then no data class is assigned.
Because I know I have columns that contain last names that may not be called “LAST_NAME” or may not even have matching data in the set file, I can use a regular expression to match my data class to like column names. For instance, there may be a column named LNAME or LASTNAME.
To edit the LAST_NAME data class, click on the LAST_NAME entry in the Data Classes view and click Edit. Change its name to L(AST)?[_-]?NAME (underscore and dash in the brackets). Click OK. Click Apply and Close.
You should predetermine how you want the values in each data class to be masked (i.e., their target column format), so you can define those rules next. In our example, there will be redaction, format-preserving encryption, and pseudonymization rules. Each need only be defined once, from the IRI menu.
To define these rule in this example, follow these steps:
Rule 1 – Redaction (for Social Security Numbers)
- Select IRI menu > New Rule.
- Select Field Rules and click Next.
- Select Redaction Function, use SSN for the start of the Rule Name so it reads SSNRedactionRule, and click Next.
- Select the Define Mask radio button. Type 1 in Start position and 5 in Length. Click Add to Table and Finish.
Rule 2 – Encryption (for credit card account numbers, email addresses, and phone numbers)
- Select IRI menu > New Rule.
- Select Field Rules and click Next.
- Select Encryption and Decryption Functions and click Next. Don’t rename the rule.
- Select the enc_fp_aes256_alphanum option on the left. Enter secret for the Passphrase. See this page on encryption key management options.
- Click Finish.
Rule 3 – Pseudonymization (for last names)
- Select IRI menu > New Rule.
- Select Field Rules and click Next.
- Select Pseudonym Replacement, rename it LNamePseudonymRule, and click Next.
- Click Use your own pseudonym list, and Browse to the lookup file, C:/git/workbench-demos/Database_Classification_Masking/sets/lnames.set
- Select Use random draw from pseudonym list. Note that recoverable pseudonymization is also possible, but is more complicated due to probable changes to your source data.
- Click Finish.
Now that our data class masking rules are defined, we can perform search and masking operations to find and fix the data globally across one or more database schemas.
Scan – Run the Schema Data Class Search Wizard
To find all the data conforming to our class definitions in all the tables of a schema, use the Schema Data Class Search Wizard. This produces a report of each table and column with the pre-classified PII inside, creates a data class file specific to your project, and opens a form editor for that file. In that editing dialog (our next step after this), you can review and modify your data class and masking rule definitions before moving onto global data masking in the final step.
You can run the wizard from the Data Discovery menu group in the IRI Workbench toolbar. You can also run the search wizard directly from the Data Source Explorer instead, to pre-populate the wizard with a selected schema. Right-click on the SCOTT schema in the Data Source Explorer (DSE), and select IRI > Schema Data Class Search.
On the search wizard setup page, enter the location to save the data class file. There can only be one of this file type in each project, hence the read-only status of the name field. Leave the defaults as is. Click Next.
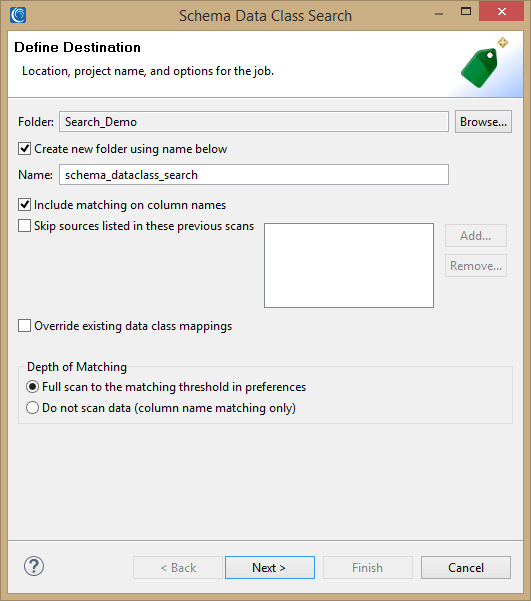
The input page shows that one schema is selected. Click Next. The next page allows you to limit the columns searched by data types. Include NUMERIC, and click Next.
The Exclude Items page allows you to exclude tables or columns during the scan. Click Next.
The data class page allows you to filter the data classes that will be used during the scan. Select only CREDIT_CARD, EMAIL, L(AST)?[_-]?NAME, PHONE_US, and PIN_US. Click Finish.
Along with reports, this creates (or appends) a data class library with mappings between source columns and data classes. The form editor that opens allows you to assign rules to the results.
This search through 46 tables yielded 18 column matches, which I know to be mostly, but not fully complete:
I know that a couple columns were not matched due to the tables being empty or names not finding matches in the set files. In the next step, I can address those misses and confirm my masking rules on a per table basis.
Review & Adjust – Data Class Library Editor
Now that the search results are open in the data class library form editing window, you can examine and modify column rules at the table level, and eliminate empty tables in the schema with column names matching your data class names. All of this helps confirm that you are set up correctly for the bulk masking job to follow.
Note that this view also supports flat file (directory data class) search results along with your database search results. By joining those results to your data class library, it is easier to keep your masking functions (rules) the same across disparate data sources. That helps maintain referential integrity and test data consistency in more distributed application environments.
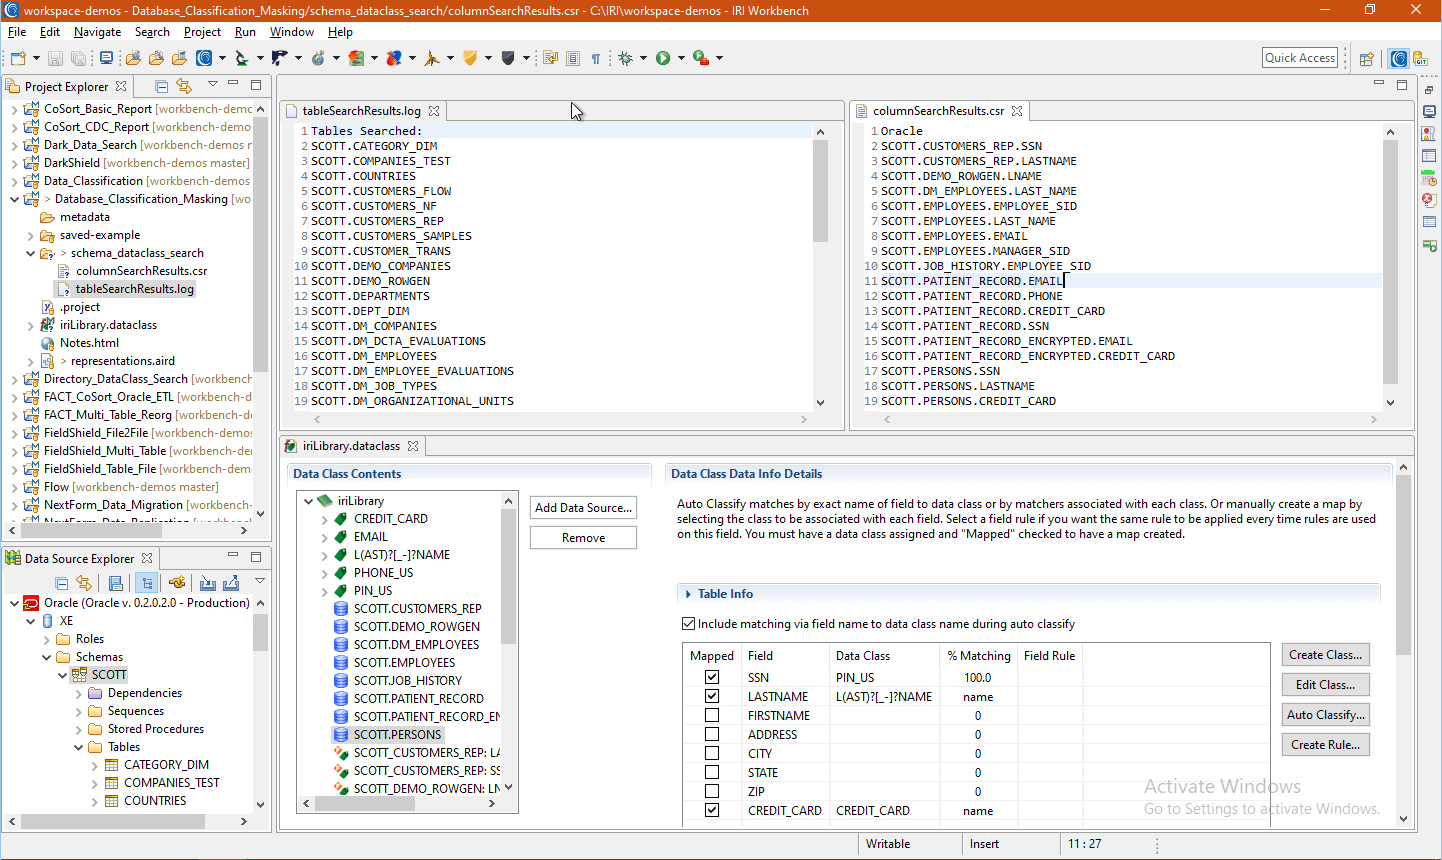
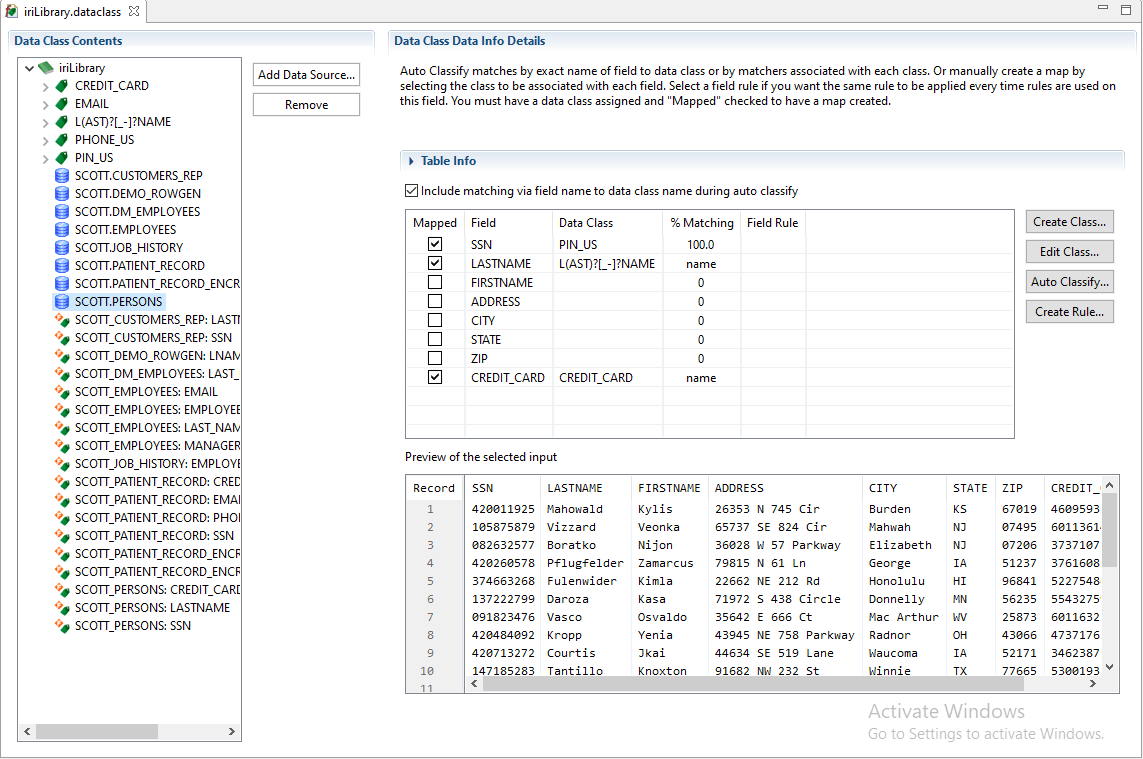
Click a data source (table) to display details about that source and a preview of the data within it. If a match to a data class was made, that column shows that class and how it was matched.
In the case of my PERSONS table below, you can see that: all the SSN column values matched the RegEx pattern of my PIN_US data class, and the LASTNAME and the CREDIT_CARD columns matched their data class names, precluding the need for those column scans.
Edits to the data class mappings can be made by either changing the data class via drop down, or unselecting the column to remove the mapping completely. If a table is empty, it may not assign all the mappings desired. There are three ways to handle this:
- You can add the tables to the exclude page in the classification wizard above so that it is not added to the data class library
- If the table may have data in the future, assign the data classes manually here. Then either
- Uncheck them in the masking wizard
- Leave them and the masking wizard will create job scripts that run but don’t mask
- or, remove the data source from the data class library
In this example, select the following data sources and click Remove since they are empty or don’t need to be masked:
SCOTT.DEMO_ROWGEN
SCOTT.DM_EMPLOYEES
SCOTT.PATIENT_RECORD_ENCRYPTED
Care must be taken to verify the results in the data class library before masking. Sometimes matches are missed because the data is not valid or the data class matcher needs to be modified. It is also possible that false positives could occur. 1
In this example, a data class needs to be manually assigned because there are invalid email address and US phone number formats, but we want to mask those columns anyway. We can select and classify this column to:
SCOTT.EMPLOYEES.PHONE_NUMBER > PHONE_US
Once the results are reviewed and modified as needed, click on the data classes in the library on the left to assign default rules. This will allow you to assign the rules to all the sources by just assigning a default rule to a class.
In this example, I assigned my masking rules to the data classes in the library as follows:
CREDIT_CARD > FieldEncryptionRule
EMAIL > FieldEncryptionRule
L(AST)?[_-]?NAME > LNamePseudonymRule
PHONE_US > FieldEncryptionRule
PIN_US > SSNRedactionRule
You can verify that your global rule assignments propagated fully and correctly in the data sources by reviewing the masking rules in each. For example, in the SCOTT.PERSONS table first shown above with rules, we now have:
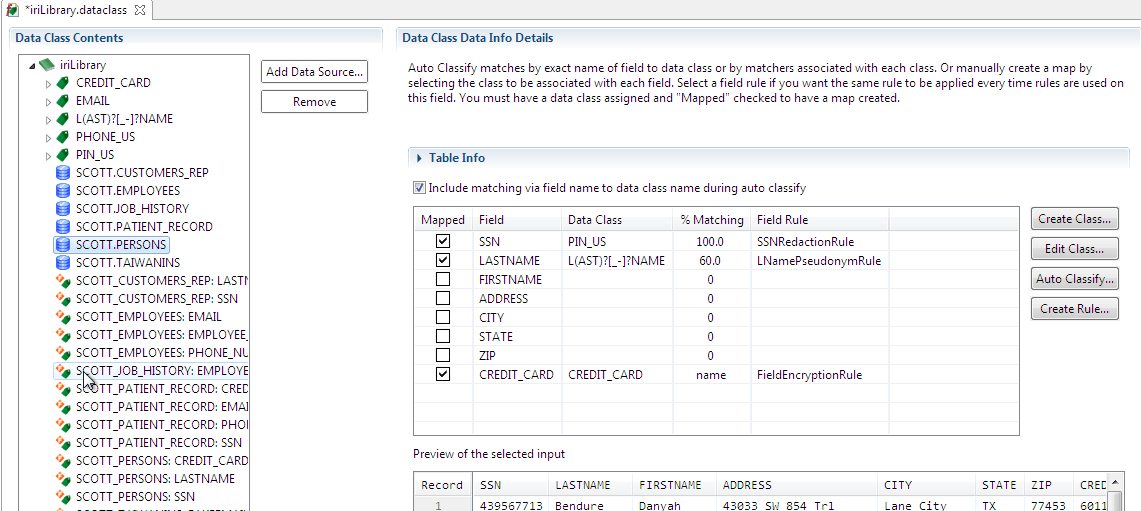
If a column in a particular table is missing a rule, or needs a different rule, that rule can be added or modified after the default rules are applied by addressing them in each data source.
Mask – Run the Data Class Database Masking Wizard
Once you have verified that the right masking rules are assigned to your data classes, you are ready to apply them globally.
Right-click on the iriLibrary.dataclass object in your project folder in your IRI Workbench Project Explorer tree, and select IRI > New Data Class Database Masking Job. In the first page of the wizard, verify that the project folder is where your data class and rules library were saved, and name the job. Select the Show summary page to see the details of the job.
The wizard allows you to update the masked results in the Same source tables (to statically mask them), to Different target tables, or to Flat files (recommended) so you can first validate the results, and load them to targets.2 Change the Output to Flat files and click Next.
On the Data Class Filter page, leave all data classes selected. Click Next. On the Data Sources page, leave all items selected. If there were tables that you did not want to run the job on, you would unselect them here.
Because I elected to show the summary screen, I can verify the job:
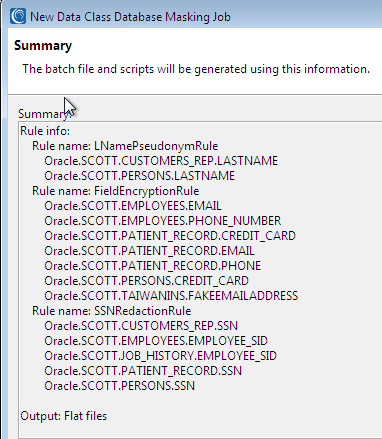
before clicking Finish.
The scripts are then created and a flow diagram is opened to illustrate the entire job, which is also serialized as a Windows (or Unix) batch file. Each table that will have a column masked is represented by a brown transform mapping block, which is serialized in a task script.
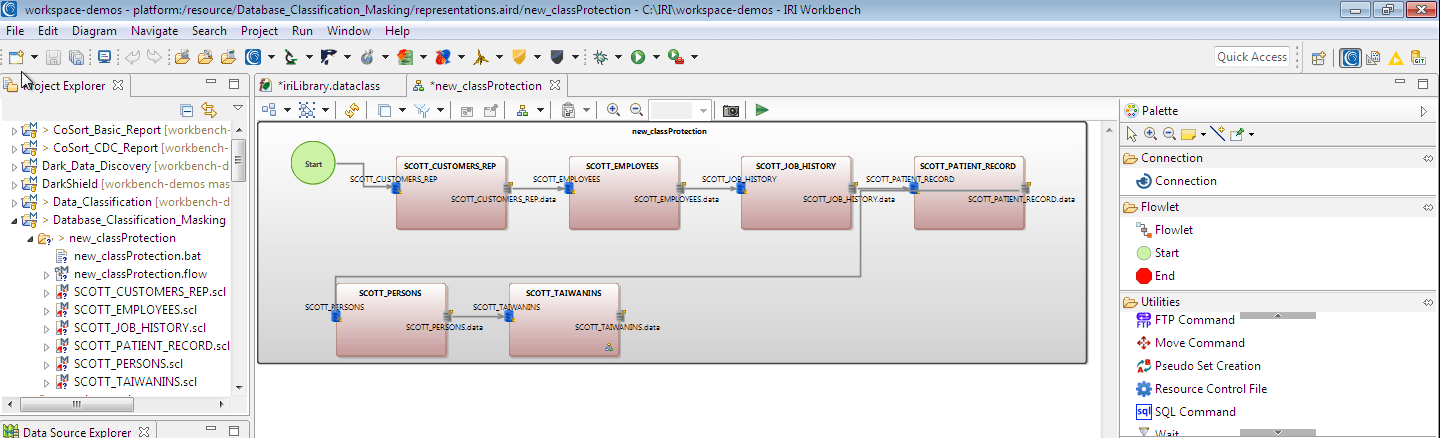
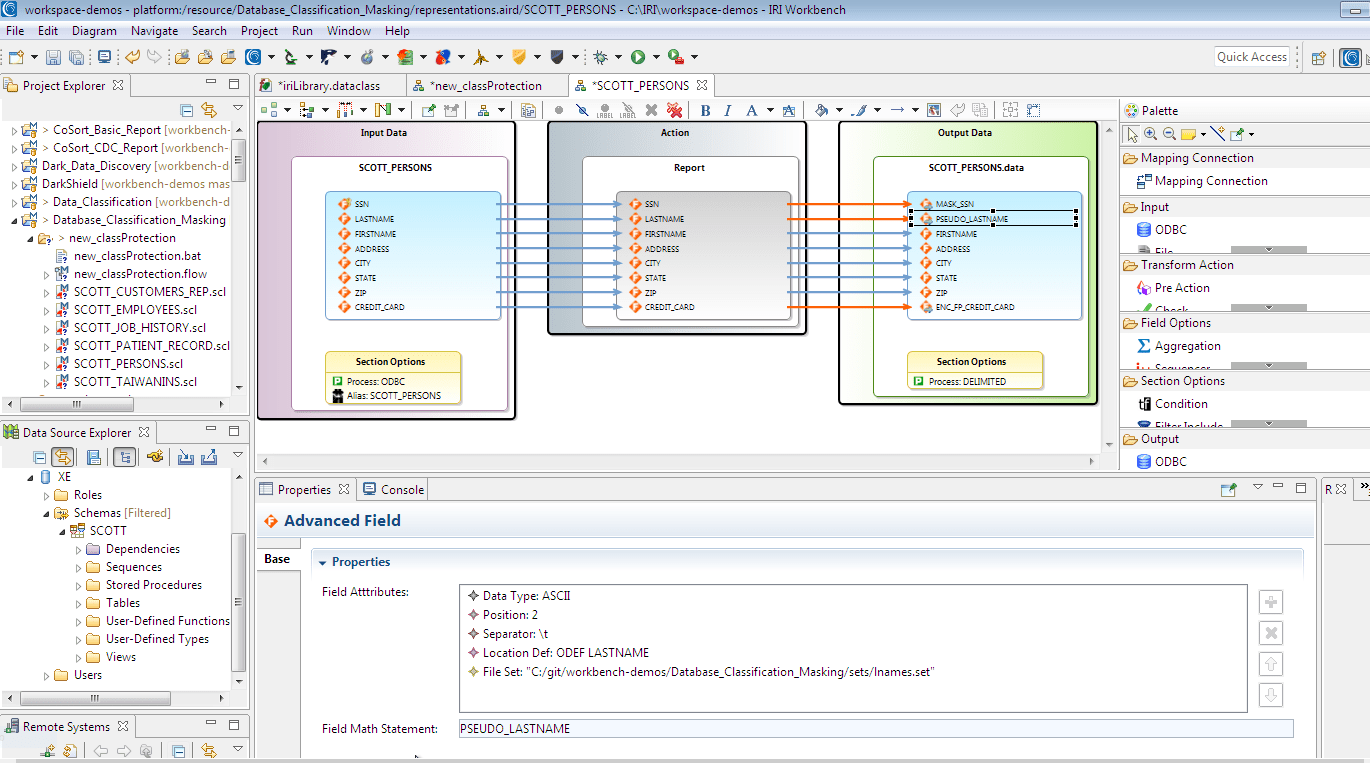
Review the masking operations by double-clicking the transform mapping blocks and examining the orange lines to the targets. These denote columns being changed from input.
Click in the fields to the right of the orange line and see the properties view at the bottom of the screen. The Advanced Field statement shows the transformation (masking function) applied.
Once you are comfortable with the masking job that was built, run it. In the new_classProtection folder, right-click the new_classProtection.bat file and select Run As > Batch Program.
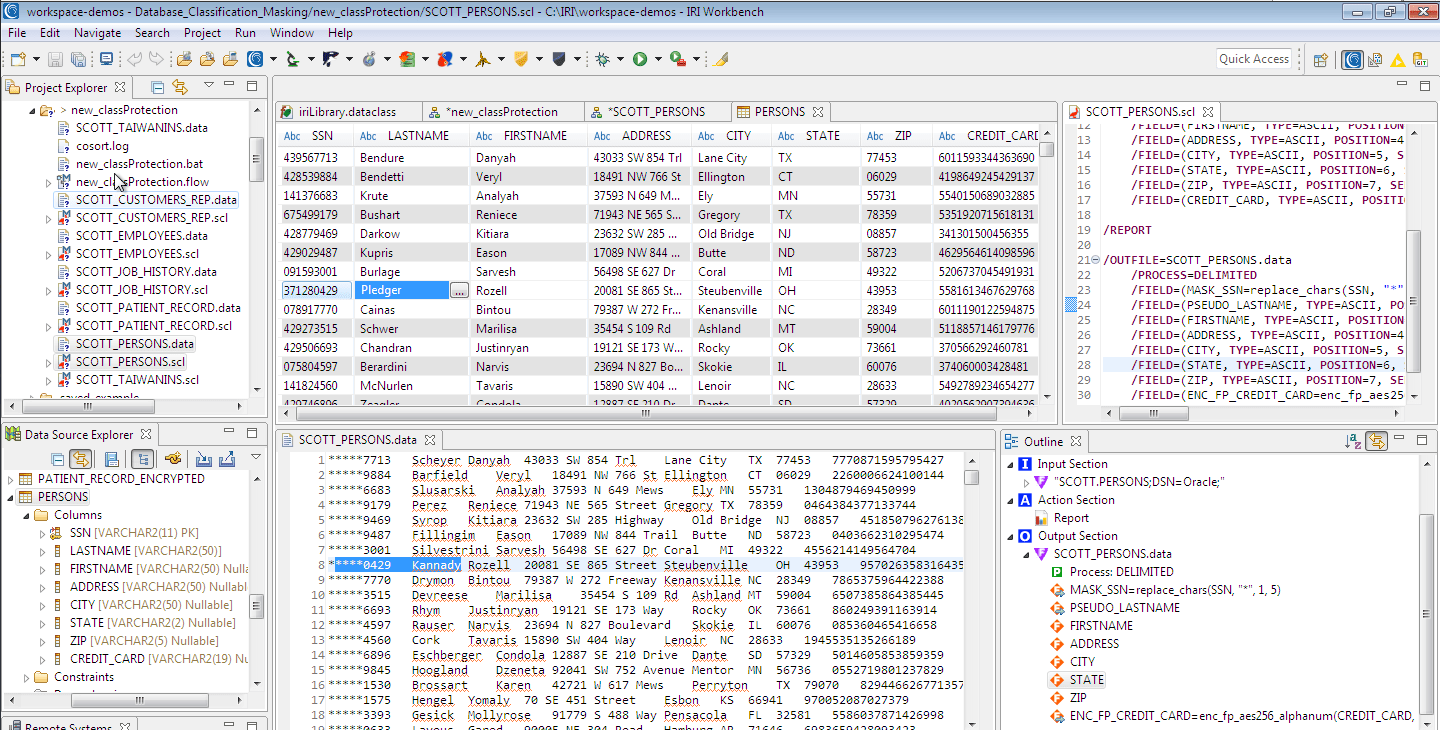
The job runs on the command line, and the masked output files can be opened for review from your project folder or file system. Indeed, after the batch operation runs, all the masking task scripts and flat-file outputs are shown in my new job folder.
The screenshot below shows those on the left, the before and after state of one of my tables, PERSONS, in the center, and the specific task statements in script and outline form on the right. See how the three columns classified and rule-assigned in this table were masked as planned:
Once the batch masking job runs, you can double-check the results before you:
- load them into tables in IRI Workbench (which can auto-create loader files);
- modify the job to make changes; and/or,
- re-run the wizard to direct the output to tables instead.
These masking jobs run on the command line, and can be triggered or scheduled for data refreshes and automatic archival. Contact fieldshield@iri.com if you have any questions or need help with any aspect of this end-to-end configuration process, or its deployment.
- To preclude the possibility of false positive search results on credit card and national ID numbers, you can automatically perform a computational validity check during searches through pattern-matching values. Select or create a data class validation script to associate with the data class definition.
- If you use FieldShield in Voracity, you can simultaneously or subsequent sort those files on the primary index key of the target table to speed bulk loads and common queries.